READ FIRST: Disclaimer – Malware can destroy data, damage your computer, cause your computer to damage other computers, steal information, or cause other harm to property and even life in the case of a system which is in control of some equipment or machinery. When analyzing malware, you must always do so on a machine which has no personal identifying information, you do not personally value, and which is de-networked (not connected) to any other device of value to you or anyone else. If you choose to use the techniques described in this article, you are agreeing that you understand this notice and that you use the information at your own risk. PC Pitstop, Inc. is not responsible for any damage to property or life as a result of following the advice of or otherwise using the information on this page. The proper way to analyze malware is on a de-networked device with no private information, which is not in the position of controlling any equipment, and/or an isolated virtual-machine environment subscribing to those same terms. If you do not understand or do not agree to the above terms, please exit this post and do not follow any information in it to analyze malware.
In our last blog post, we went over basic executable unpacking. This post assumes that the reader has an unpacked executable on disk as per that walkthrough, but which is not functional and has no proper import address table (IAT). We will also cover some interesting things that can go wrong so that the reader can be prepared to handled these situations when dealing with IAT reconstruction. For this example, any executable packed with ASPack, UPX, or several other generic packers is sufficient and the same steps can be followed to rebuild the IAT. We use programs called “unpackmes” which are designed specifically to be unpacked rather than actual malware to practice on, but when malware is packed using these generic packers, the exact same techniques can be used to unpack the malware. To view larger images in this post, simply click the photo.
Brief Review
In short, an executable on Windows requires more than just the programmer’s code in order to run. To do almost anything useful, it requires the operating system APIs. Examples of useful activity include writing to disk, reading from disk, displaying anything on screen, listening for keyboard input, and more. To do any of these things, the Windows OS APIs must be used and therefore, the API code must be available to the program. In fact, even if a programmer runs a program using the C standard library on Windows, ultimately, these calls get turned into OS API calls anyway by the compiler. The way the program makes these APIs available is by using the Import Address Table to tell the OS Memory Manager and image loader where they are and which APIs are needed in the IAT.
For the file to run, it must have a valid IAT, which it does not because at the time we dumped the code from OllyDbg or x32Dbg, we didn’t dump a valid IAT. Thus, a valid IAT needs to be created based off of the code in the file and also the new memory offsets. To do this, we have to get the new OEP, provide it to one of several different import reconstruction programmers such as Scylla or Import REConstructor, and then scan the in-memory image for imports. The program will then compute a new IAT and offer to “fix” the dumped file. Once this is done, the file should be runnable on Windows because the tool will have set up a proper IAT and the OS now knows where to find the proper APIs for the program to function.
The Reconstruction
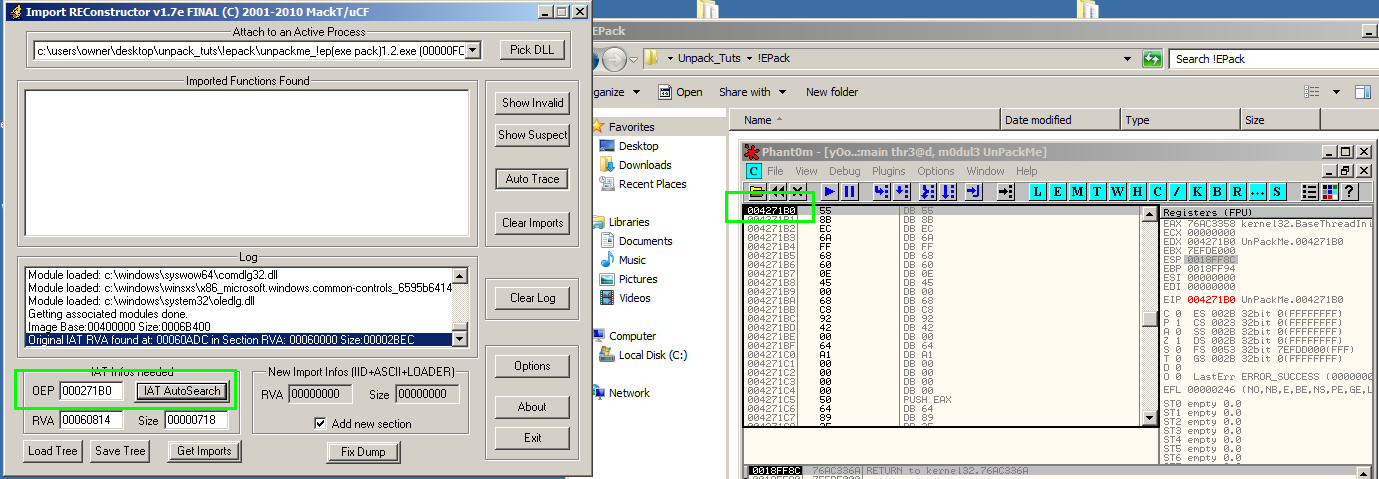
Resume where we left off previously with whichever original program you were working on. Remember, you must have found the OEP and the program must still be loaded into the debugger (x64Dbg or OllyDbg). We use OllyDbg here so if you want to follow along exactly, we recommend you also use OllyDbg. With the program unpacked in memory, save it to disk by following the instructions at then bottom of the previous post and make sure to write down the address of the OEP which should be inside of the EIP register at the time we found the OEP and decided to dump the file to disk. Do not close out the debugger. Instead, open up either Import REConstructor or Scylla as administrator. We use Import REConstructor here. There will be a dropdown list in either program which will list all of the available processes to attach to. Attach to the program that you are trying to unpack like so:

We now enter the OEP into the reconstructor:
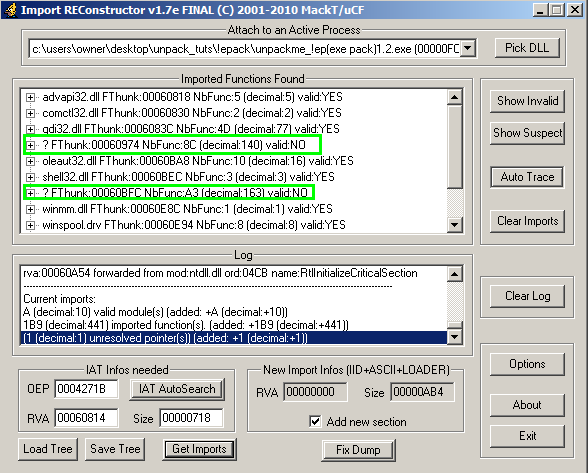
Now, click Get Imports and as long as the OEP is correct, we will have a list of imports, aka “thunks” inside of the main window like this:
The reason they are called thunks is because instead of being the actual functions, they are pointers to the addresses of functions; this is called a “level of indirection” and is commonly used in computer science. In fact, sometimes malware will use this very concept to try and fool analysis by adding a chain of thunks to obscure calls to functions. When a collection of thunks is grouped together, it is sometimes called a Jump Thunk Table. You can read more about thunks at this StackOverflow question..
At this point, we need to make sure that all of the thunks are valid. What this means is that we don’t have any thunks which are pointing to invalid addresses and the list of thunks conforms to the format required by the Windows PE Loader. Once all thunks are valid, we can click “fix dump” and then select the file that we dumped in the previous blog post. However, we have a problem here as seen in the previous screenshot where 2 thunks are not valid, so we will now cover how to fix this, as well as other issues that can arise at this step and how to handle them.
Common IAT rebuilding problems
Here we will cover a few common issues you will run into when you are inside of Import REConstructor which can be a real hassle unless you know what to look for and how to handle the situations.
#1 – There is no 0 spacer between two imported functions from two separate modules
When this occurs, you will see the following in import REConstructor. Note the highlighted areas:
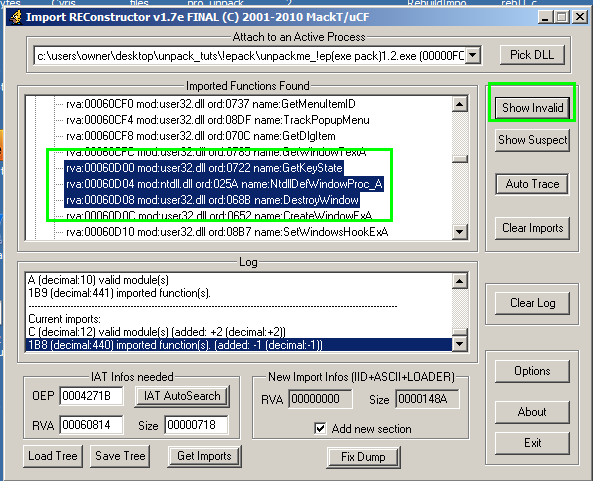
What’s gone on here is that we have 2 separate functions from 2 separate DLLs trying to be loaded next to eachother with no space inbetween. This is not allowed and thus the thunks are invalid. As the screenshot shows, these two DLLs are kernel32.dll and ntdll.dll in this case. This often occurs because one of the thunks is what’s called a “forwarder” to another. For example, the CreateFile API in kernel32.dll may forward to NtCreateFile from ntdll.dll. In this particular case, the user32.dll function DefWindowProcA is being forwarded to ntdll.dll function DefWindowProc_A. To fix this, we have to simply go into the function being forwarded to (the ntdll function) and change it to the same function which is inside of the original dll (DefWindowProcA in user32.dll). To do this, double-click the ntdll thunk listed and a window pops up. In the “module” drop-down menu, select user32.dll and then in the search box below type in DefWindowProcA and you will see the function to select from the list. Simply double-click it and you’re done. Once we save these changes, the import becomes valid.
#2 – Import REConstructor couldn’t resolve the function
This is also a very common problem where you will see question marks or there is otherwise an invalid thunk without the above scenario where there is is a separate module.
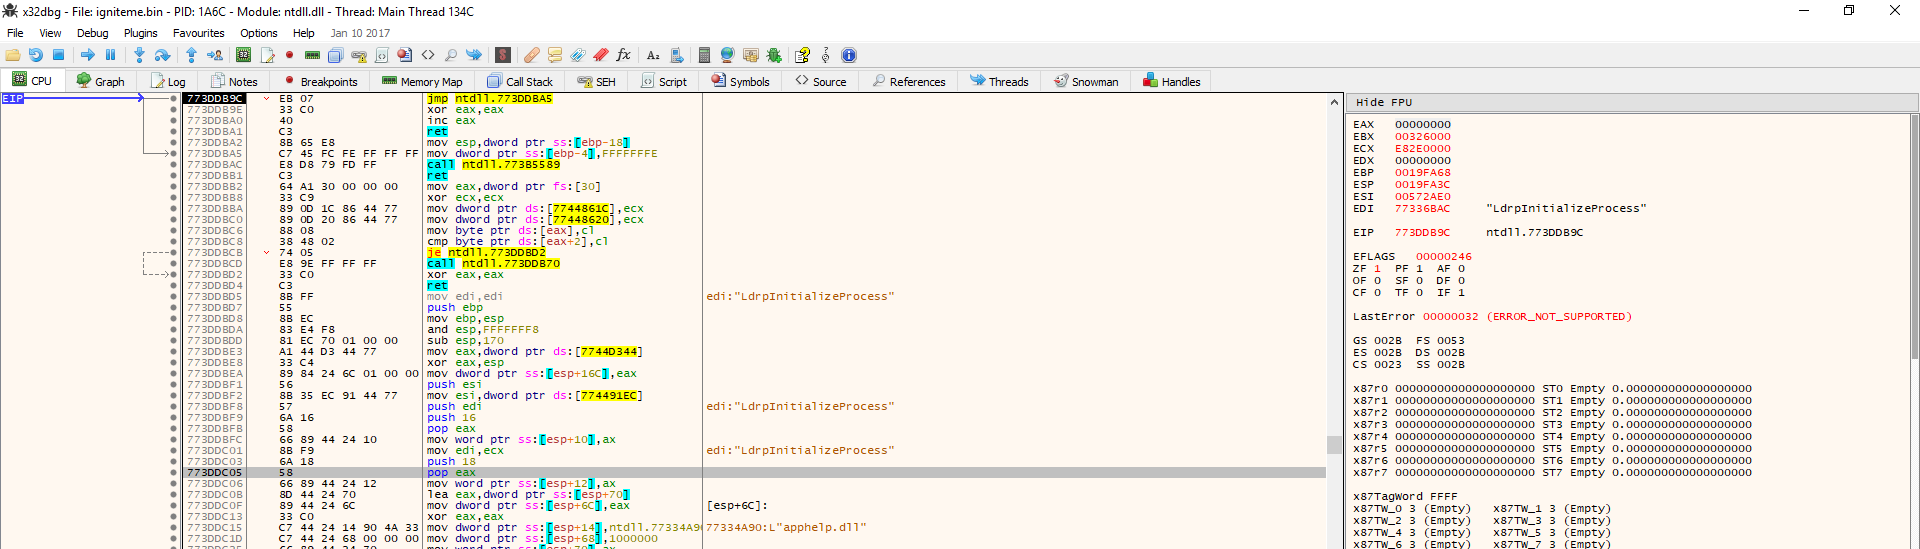
These can be resolved by right-clicking the thunk and clicking “Dissassembly/Hex” and then examining the disassembly. At this point, simply look for call instructions and to the right of them will eventually be a thunk name such as CreateFile, GetKeyStateAsync, VirtualAllocEx, ResumeThread, etc… We wanted to show a screenshot of this situation, but we do not have a packed file handy right now which has this particular problem (go figure). But, view the screenshot in problem #3 below to understand which assembly window we are talking about. In the below screenshot, you will see calls to SE functions. For problem #2, you have to ignore these calls and other apphelp calls and find the single call to the main function as mentioned above.
#3 – The GetProcAddress Problem
For whatever reason, Import REConstructor often fails to resolve GetProcAddress. The main clues here are random invalid thunks in between normal thunks where the spacer problem does not look to the case. It appears at first to be a case of #2 described above except that no API call can be fund other than apphelp.dll calls to SE functions. This can be puzzling because there are no easy clues which tell you that the function is GetProcAddress but you just have to know by experience and the few clues that we have what is going on. See the below screenshot for details:
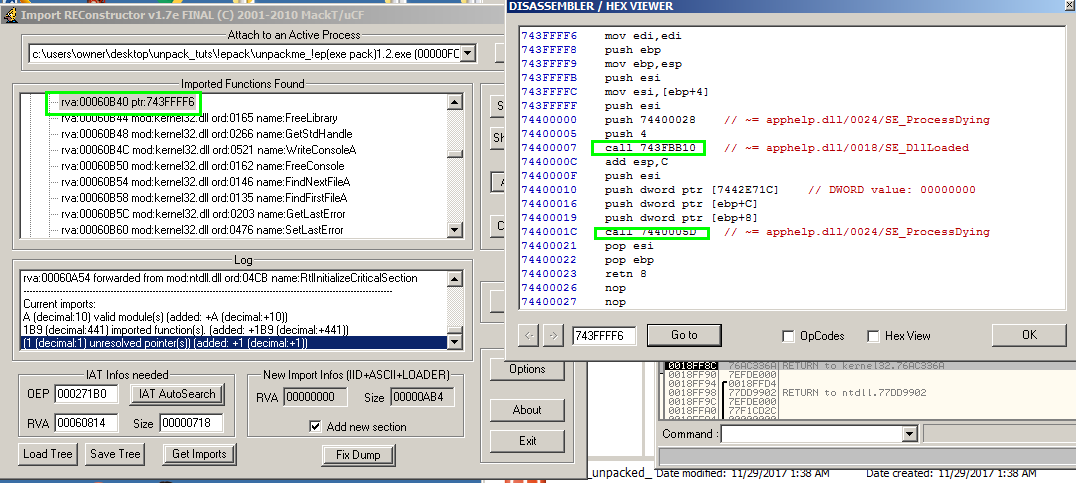
Most of the time, this is because Import REConstructor simply failed to recognize the thunk. Luckily, the program provides a way to manually fix this by going into the function’s assembly code and finding the real thunk, solving the problem like we just did. These are the three most common cases in our experience for basic unpacking IAT reconstruction with ImpREc.
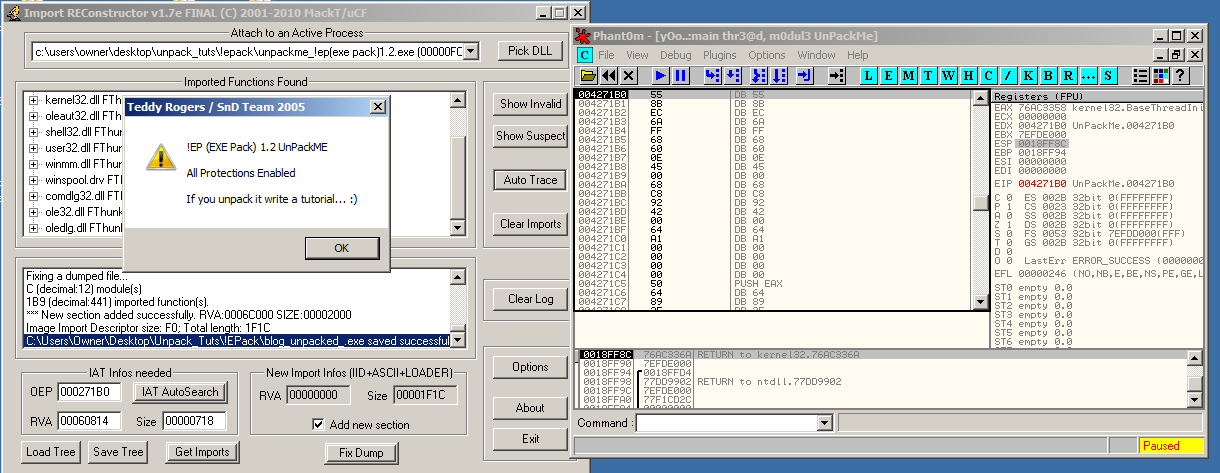
At this point if everything is correct (check by clicking the Show Invalid button once more to verify there are no outstanding invalid thunks), the file is now runnable and can be double-clicked or executed at the commandline successfully. Go ahead and click Fix Dump and select the exe that we dumped to disk from OllyDbg or x64Dbg. Even if there is still issues with the IAT making the file not executable, we can still often get enough information on the file using static analysis at this point that these steps still pay off. For example, even if we do have an invalid thunk left in the IAT, we can open the file in a tool such as PE Studio, CFF Explorer, PE-Bear, and etc and view all of the relevant imports which expose functionality of the program. These are the precious details which often trigger antivirus detection which the malware authors are trying to avoid.
Conclusion
This covers the basic reconstruction of import address tables on Windows PE files. It is important to note that the majority of packers out there can be unpacked by the techniques outlined in the previous blog and this blog. Packers such as UPX, ASPack, MPress, ExePack all can be unpacked this way in a pretty simple fashion. However, this is not an “exact science” in that each packer has unique traits and after fooling around with these enough, an analyst can begin to abstract general ideas on how packers work that will allow him or her to deal with small problems presented by non-yet-discovered packers. In fact, this is one of the things that keeps unpacking binaries entertaining and challenging.
While we did not cover the advanced protectors in this introductory walkthrough, it is worth mentioning that there exist software applications called protectors which are similar to packers except they are specifically designed to make reverse-engineering them very difficult rather than just being concerned about compressing the program. Armadillo, Themida, VMProtect, Engima, and several others are some well-known names in the protector space and generally, Themida, WinLicense, Code Virtualizer, and VMProtect are much tougher to unpack than anything we’ve shown here. To get a glimpse at some of the advanced tricks of these protectors, you can view the features of the Themida protector on their website. It is important to note that most protector developers such as Oreans who makes Themida, create their product for legitimate developers who are trying to prevent or discourage the reverse-engineering of their code to hide trade secrets. These companies generally do not endorse the usage of their protectors for malware authors and often put many protections and vetting mechanisms in place to prevent abuse.
Still, cyber criminals end up cracking the protector applications and then using them to protect malware and hide from most antivirus. If you have PC Matic SuperShield installed and enabled, you will be protected from executables from all of the aforementioned packers and protectors because SuperShield hooks and stops all executable files from running unless they are whitelisted. This is very important because packers can hide malicious behavior from heuristic and blacklist-based antiviruses and if they are allowed to execute, they will unpack their payload and take over the machine and it will be too late.