Sometimes your computer gets in rough shape and needs to be reverted back to it’s original state. However, no one wants to lose all of the software, settings, or documents and pictures you have accumulated. So Microsoft often offers the ability to do a repair install. This process will help revert all of the system files back to their original state, hopefully fixing any problems, without losing all of your data, software and settings. In Windows Vista this is called an Upgrade Install.
IMPORTANT –
- You will need Windows Vista installation media that came with your computer to complete this process.
- This process will also not work if you have Service Pack1 or Service Pack2 installed with Vista ( You will need to use installation media that has the same service packs installed).
- Be sure to backup any important data you have, just in case something goes wrong during installation. You may need to reinstall some of your drivers.
Upgrade Install of Windows Vista
1. Make sure you are logged in under an administrator account and insert the Vista installation DVD into your computers DVD drive. You can also use a Vista installation USB drive if you have one.
2. The computer should autoplay the DVD and open up the first Install Windows box. Choose Install Now (See photo below).

If it does not autoplay, navigate to your DVD drive in Windows Explorer, click on the DVD and double click Setup.
3. Next you will be presented with a box to choose whether you want to upgrade with windows updates or without them. If you choose with, the process will take a little longer. If you choose without you will need to run windows updates when the process completes (See photo below).

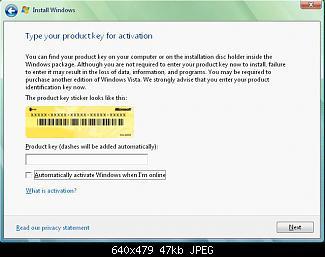
4. You do not need to type in a product key on the next screen
5. Do not check the box labeled Automatically activate windows when I’m online.
6. Choose next (See photo below).
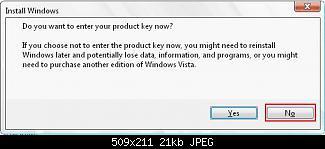
7. In the next dialog box, choose No in response to the question, “Do you want to enter your product key now?”
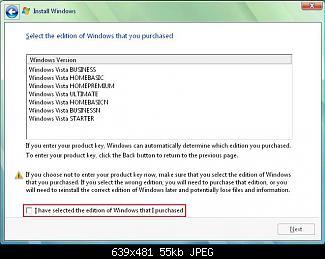
8. Choose the version of Vista you have from the list, and then check the box at the bottom and click Next (See photo below).
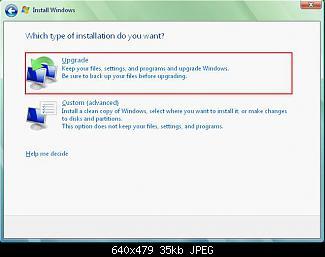
9. Choose the upgrade option (See photo below).
10. Continue through any of the instructions while Vista finishes installing until you reach the final welcome screen.
11. Remove your installation media from the DVD slot or USB port.
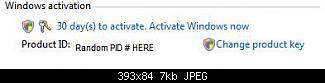
12. Your last step to complete this process is activating Vista. Open the Start Menu and right click on Computer.
13. Choose Properties from the list.
14. Scroll down and click on Activate Windows Now (See Photo Below).
Additional Notes:
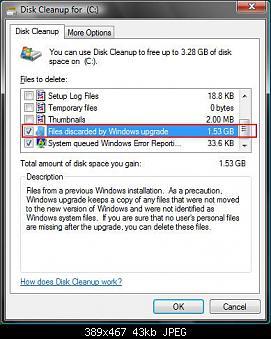
If you appear to be missing any of your personal files after this process. Follow the steps below.
1. From the start menu type Disk Cleanup into the search box and run it.
2. Look in “Files deleted by Windows Upgrade” if it’s displayed to see if they are in there, and copy them back to where they belong.
Original guide and images by Shawn at Vistax64 can be found here: Original