Thank you for the huge number of questions sent to “Ask the Prosâ€. We’ve had an overwhelming response and we’re doing our best to read each and every one. I sincerely wish we could answer your questions directly but the numbers make that impossible. I’ll continue to select those that occur most often. Keep them coming, and don’t be afraid to submit more than once.
This first question is one that I noticed in the last newsletter but just couldn’t get to it in time. I’ll start with this one from James Johnson.
Q. “I am a computer novice but I have been reading a lot about computers systems. My problem is I need some web page to go to read a user manual about how to put a raid 1 on my twin SATA Western Digital drives at 500GB drives each and how to download the raid drivers. It took me one year to read about how to build a computer system. I have it up and ready to go but I don’t know how to do the above statement about raid 1, I’m scared about doing it. I might mess it up. jjohnson46.”
A. Let’s start by defining RAID. RAID = Redundant Array of Independent Disks. It is a technology designed to use multiple drives simultaneously for increased capacity, speed, or redundancy. Various levels of RAID can be achieved with operating system based software by creating Arrays, combining partitions and disk space on the operating system. A hardware controller is not necessary for Software RAID.
Hardware RAID requires a hardware controller and 2 or more drives. A hardware RAID controller can come on the motherboard or as an add-on RAID controller card.
Because there are so many levels of RAID and because covering the complete topic would require writing a book, I’m confining my answer to an overview of hardware RAID and to the basic RAID 0, Raid 1, RAID 1+0, and RAID 5 Levels. If you are requiring more comprehensive coverage, I suggest first reading the Wiki article and then check for in depth tutorials on each RAID level. Keep in mind that each motherboard and each RAID card may have slightly varying commands for access.
RAID LEVELS
RAID 0 = Use this for speed. RAID 0 uses 2 or more drives in what is sometimes called a stripped set. A 3 drive array is my favorite and a 4 drive array is “outrageous” fast.
RAID 1 = Use this for safety, redundancy or back-up. Sometimes called a mirror.
RAID 5 = The best of both worlds as it provides speed and redundancy. RAID 5 uses a minimum of 3 drives. RAID 5 is viewed by many as the best choice as it even has a “Data Recovery Mode” If a disk fails, the computer can notify the user and although performance is slowed the system still is operational.
RAID 1+0 or 0+1 = Striped mirror or mirrored stripe. Much is written on which is best but it’s your choice. Because there is no real difference in speed I lean towards a 1+0 as it appears to be safer.
Not covered here are RAID 2, RAID 3, RAID 4, and RAID 6. They all have their place but for most of us the BIG 3 should get the job done.
Mirror or stripe, you will need two identical drives. Yes, it’s possible to use non matching drives but you will be penalized by the size of the smaller drive. For example, if you’re using a 60 GB drive and a 100 GB drive in RAID 0, you will be limited to a total of 120 GB for your array.
Also be aware that while it’s possible to build an array and transfer your existing Windows installation, it’s much easier to build the array, install Windows, and then transfer only the data from your original drive. That should give you a much cleaner and more stable Windows RAID array.
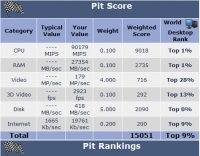
You’re now ready to make your first RAID Array. If you choose a RAID 0 array, you’ll be able to measure the difference in speed using the PC Pitstop OverDrive scan. Keep in mind that if you’re going for speed, the more drives the merrier. The most I’ve used is 4 drives and my favorite was RAID 0 using 3 150 GB Raptors. This produced excellent speed which was easily measured using the Pitstop OverDrive scan.
I should probably note that it’s possible to use the new solid state drives (SSD) that are becoming so popular. A couple of us more addictive types were able to put together some wicked fast RAID 0 arrays using these. The cost per GB was high but the lack of heat, weight, and increased speed were remarkable. Here is a link from one of our members showing an array with 6 SSD drives in RAID 0. Click on the “Rankings” tab to compare your score to this Monster. Note, the ranking of Top 0% means there are none higher.
HOW TO
1. Obtain your RAID Drivers: You might have received them on a floppy disk when you purchased your motherboard or as in the case of Asus motherboards you may need to visit the Asus website and download them. After downloading, be sure to put them on a floppy for access during the Operating System installation. There normally are instructions on the manufacturer’s website for installing the drivers to a floppy for easy access. You may choose to make a slip-stream copy of the Wndows installation with the drivers included. If you’ve purchased a separate RAID controller card, it should come with the drivers.
2. Connect the Drives: if you are using a system that has a RAID controller included on the motherboard the first thing to do is to physically connect the drives to the correct SATA or IDE connectors. You will need to check your motherboard manual to confirm which connectors are designed for use with RAID. The number of drives you are able to configure in your RAID array will be determined by the controller on your motherboard. Be sure to turn your computer off and disconnect it from any power source. Once disconnected be sure to depress your power switch to remove any stored charge to prevent accidental shorts.
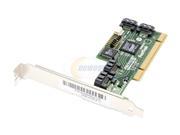
If your motherboard does not come with a raid controller you can purchase one from your favorite online or retail outlet. You will find RAID controllers made by Intel, Promise, Roswell, HighPoint and others. Prices can range from as low as $20.00 to as high as several hundred dollars.
3 Enter your computers bios to be sure it’s configured to see the raid array once it’s built. There may be one or several setting that need to be addressed and the information will vary for each board. To access your motherboards bios look for instructions similar to ” Press F2 to enter BIOS setup”. This is usually displayed during the boot process. The command is usually Delete, F1 or F2. You will come to a Bios Index screen. The RAID settings can be under Advanced Drives or Peripherals. If you have a RAID capable board there is usually a section devoted to it in your motherboard manual
4. Access the RAID Configuration Utility. After setting your bios and checking to see that RAID is enabled, I usually just reboot and go back in to be sure the changes stuck. Now, reboot and strike the keys [F10] that take you to the Raid Configuration Screen. Your correct key stroke will also be in the motherboard manual. This does change depending on the board and RAID card you are using.
5. Using the RAID Configuration Utility you will be able to choose the drives to be used, the Level of RAID, Example 1, 0, 1+0, and the stripe size for your array.
There are plenty of suggestions on choosing stripe size and if you want the very peak of performance you should check them out. I settled into using 64kb or 128 kb just because I could never sense any noticeable difference. I’ve tried many different strip sizes and read all the accompanying information on which is best for which applications back when I was overclocking, but to be honest unless you’re into saving theoretical fractions of seconds it’s mostly a moot point. 64kb or even 128 kb is a good all around size.
6. Save/Exit/Enter bios: Now is the time to check the bios again to be sure the RAID configuration is seen as a single drive. You should be able to see this on the first Drive Configuration screen of your system bios or in the Boot Sequence information.
7. Install OS: Making sure your Windows Installation Disk is in the Optical drive you can reboot to the installation CD and proceed. Early in the installation you will be given the option to press F6 and will point you to the A:/Floppy drive to install the drivers you prepared earlier.
Once you supply the drivers, the installation should proceed as normal. When it comes time for Windows to boot to the hard drive you will know if your efforts have been successful. Here’s hoping you’re looking at the Windows Desktop and ready to get your “best ever” test results from OverDrive.