Occasionally there comes a time where you will need to take drastic measures to solve computer problems. This can often lead to wiping out a hard drive and starting clean, or having to buy new hardware. However there is always 1 last method you should try before you get to that point and that’s a repair install. The reason for trying a repair install is that it can often solve system problems while leaving your personal documents, data, settings and software alone. Losing data or precious pictures is never a fun moment, but sometimes it does happen living in a digital world. Remember no matter what, you should have backups of critical data, and especially before going through computer repair processes.
Reminder before we begin
Backup any critical files. You should not lose anything during this process but it never hurts to be extra careful.
You will also need Windows 7 installation media. This can be in disc or USB form.
You should be doing this repair installation if:
- You have already tried a system restore and this did not solve the problem
- It’s the last option you have left to fix your copy of Windows 7
- Doing a clean install of Windows 7, which would lose all personal files and software, is not an option for you.
- You want to keep all files, user accounts, programs and system drivers.
The following will be reset to default, or affected by this repair process.
- Sounds
- Services
- Visual Effects Settings
- Device Drivers (You can reinstall these when the process has completed if they get removed)
- Windows updates will need to be reinstalled, so remember to run the Windows Update utility when this process is finished. We’ll remind you at the end.
Warnings
- You are only able to do a repair install with a Windows 7 installation disc that is the same edition as the Windows 7 you currently have installed.
- You can only do a repair install from within Windows 7.
- You cannot do a repair install at boot or in Safe Mode.
- You must have at least 9GB of space free on your hard drive to do a repair install.
- You can use a retail Windows 7 installation disc (upgrade or full) for this process)
- You cannot use a system repair disc or a slipstream disc on a Windows 7 SP1 install.
- You can do a repair install on a factory OEM installation with the latest official Windows 7 with SP1 ISO file here: Windows 7 ISO Download, and use Windows 7 USB-DVD Download Tool to create a bootable DVD or USB flash drive with the ISO to do the repair install from within Windows 7.
- You can only do a repair install from inside of Windows 7.
Windows 7 Repair Install
1. Start your computer, and make sure that you are logged into an administrator account. (This will not work on a non administrator account)
2. It may also be best to disable any real-time protection, firewalls, or other security programs you are using to not interfere with the process.
3. From here, you’ll continue to Step 4, Step 5, or Step 6 depending on which step you meet the conditions for. You can skip the other ones if you don’t meet their conditions.
Step 4 is for a repair install using a Windows 7 ISO with Service Pack 1 in it.
(If you do not have a Windows 7 SP1 ISO you can download it with your product key from here.)
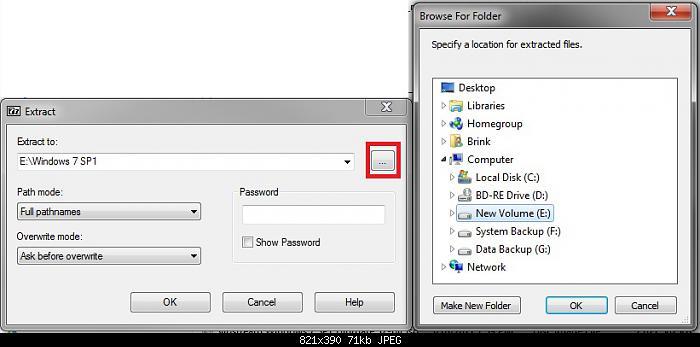
4A. You will need to download a program like 7Zip which can be found here. You will use this program to extract the ISO to a folder.
4B. The pictures below demonstrate how to do this with 7Zip. Using this program, extract the Windows 7 SP1 ISO file to a folder on a hard drive or partition other than the current Windows 7 partition. To do this right-click on the ISO, choose 7Zip, then extract files. Within 7Zip you’ll click the browse button (three horizontal dots) and choose the folder you want it to go to. Click OK two times.
4C. While in in the Windows 7 SP1, open the folder that you extracted the ISO into and run the setup.exe file.
4D. Continue to Step 7
Step 5 is for a repair install using a Windows 7 DVD/USB with SP1.
(If you do not have a Windows 7 ISO with SP1 then you can download it from here. Then use the Windows 7 USB-DVD Download Tool to create bootable installation media.)
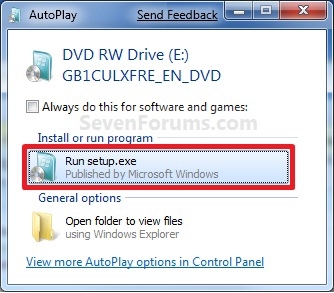
5A. Insert your Windows 7 SP1 installation DVD into the DVD drive or insert the USB drive into the USB port.
5B. When AutoPlay pops up, click on Run setup.exe as seen below.
5C. Go to Step 7.
Step 6 is for a repair install on Windows 7 without SP1 using Windows 7 DVD/USB without SP1.
(If you don’t have a WIndows 7 without SP1 DVD/USB, you can download the latest ISO from here. Then use the Windows 7 DVD/USB Download Tool to make bootable installation media.
6A. Insert your Windows 7 installation DVD into the DVD drive or insert the USB drive into the USB port.
6B. When AutoPlay pops up, click on Run setup.exe as seen below.
6C. Go to Step 7.
7. If prompted by UAC, choose Yes.
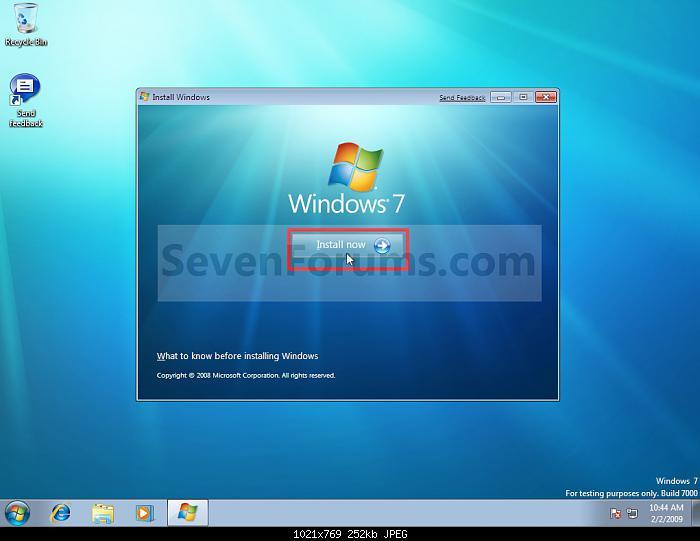
8. When the Install Windows box pops up, choose Install Now.
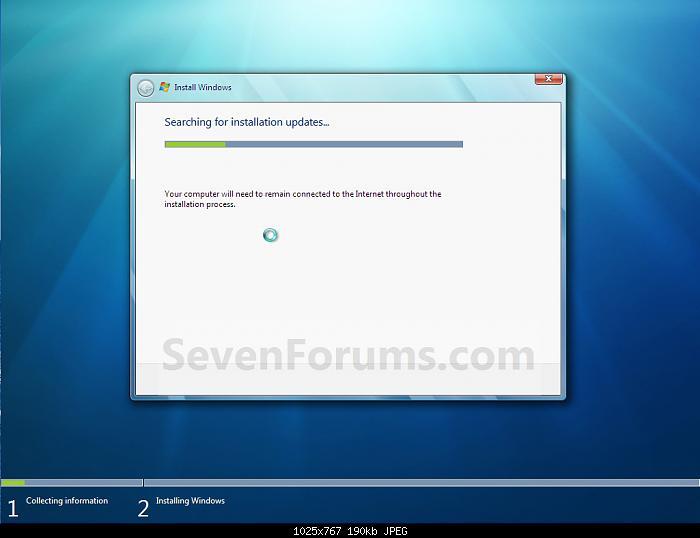
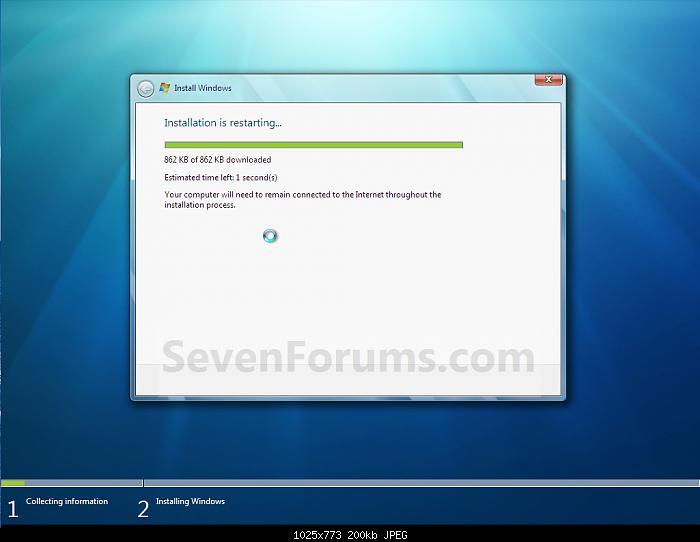
9. In the next dialog box, choose the option to Go online to get the latest updates for installation.
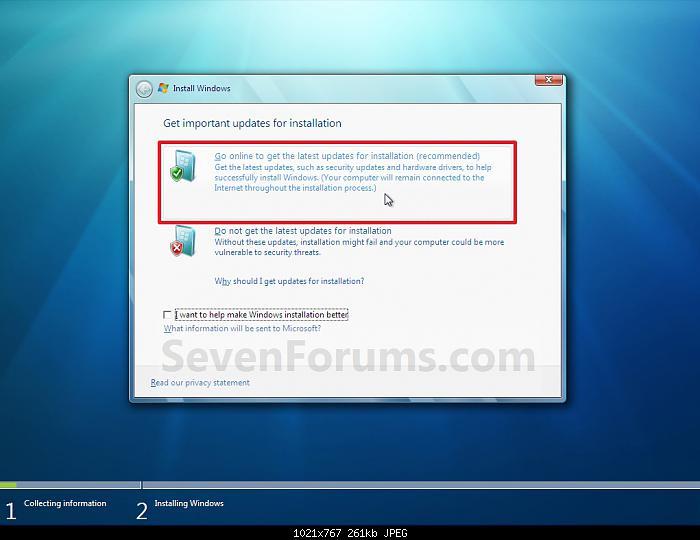
10. Wait until Microsoft has finished searching for updates to install.
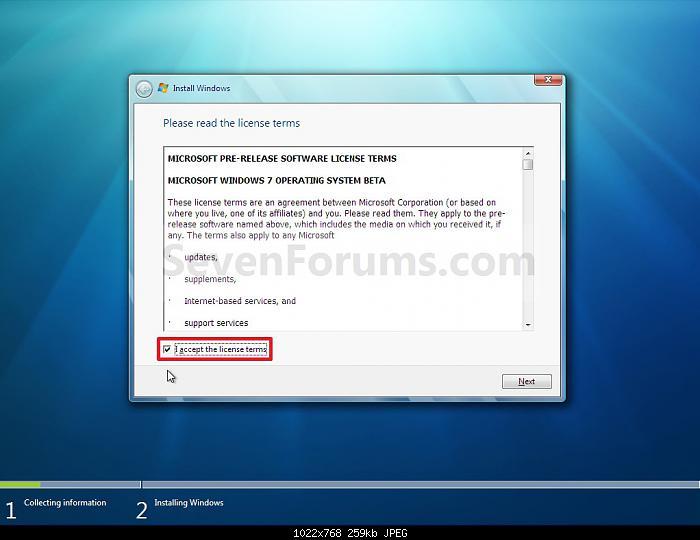
11. Choose I accept in the license terms box after reading the terms, and click on Next.
12. This step is crucial, be sure to select Upgrade in the next dialog box, DO NOT select Custom. Using custom will do a new installation and will delete all of your personal files we are trying to keep.

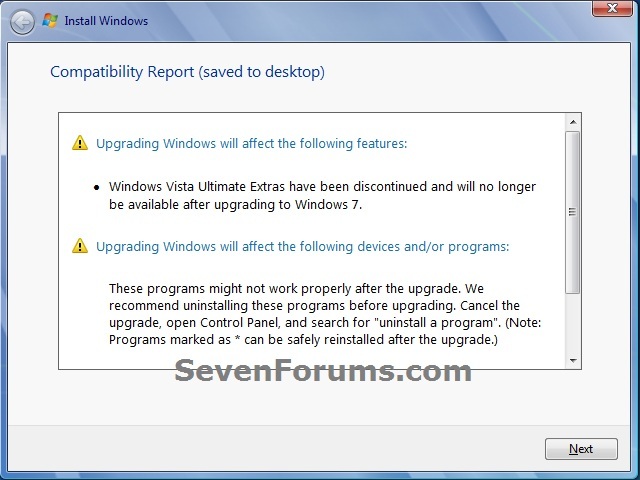
13. In the next step Windows will be looking for compatibility issues, if none arise you can continue the process. If any do, make sure to fix them and then restart the repair install process.
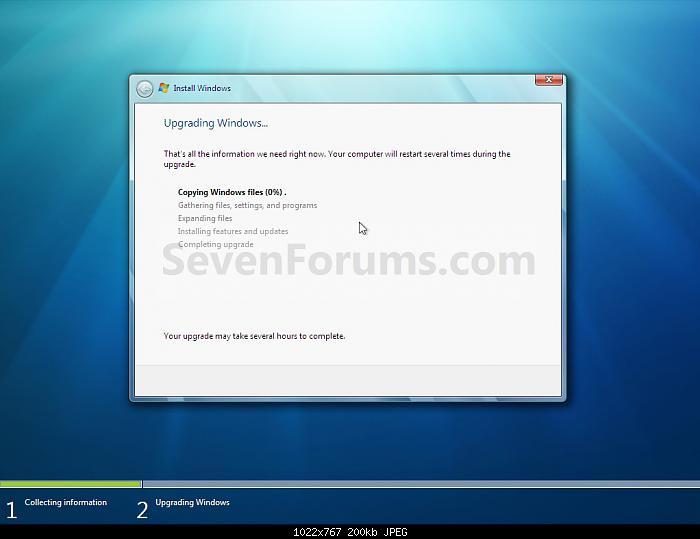
14. You’ve made it to the Windows 7 installation point! Don’t worry if the screen flashes or your computer restarts a few times, that’s normal.
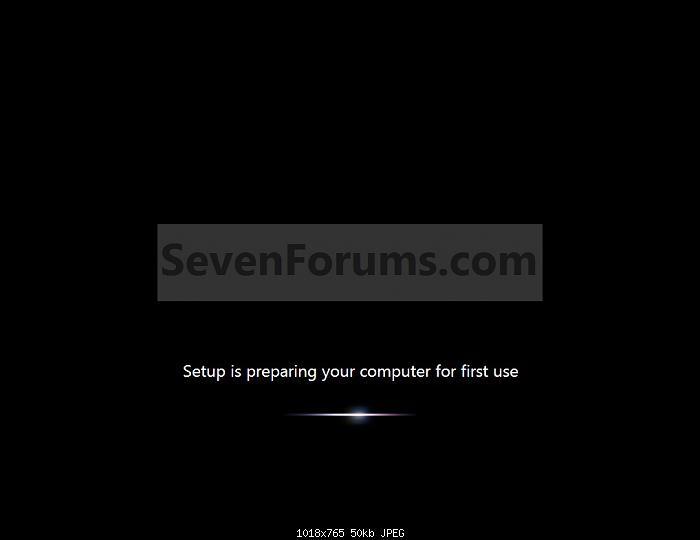
15. When the process has finished your computer will restart one last time and you’ll be greeted with a preparing your computer screen.
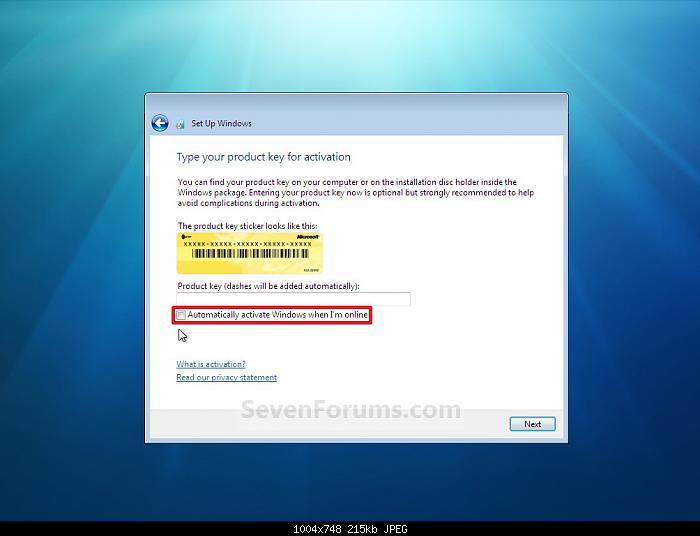
16. You should now be greeted with a Set Up Windows dialog box. Enter your Windows 7 product key to activate Windows.
17. Make sure that you uncheck the “Automatically activate Windows when I’m online” box before pressing Next.
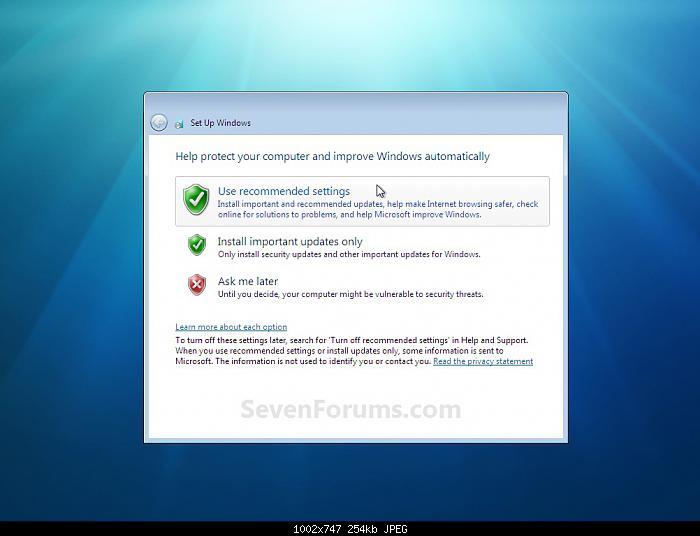
18. Here we want to choose the top option, Use Recommended Settings.
19. Set your correct time zone and choose todays date before pressing Next.

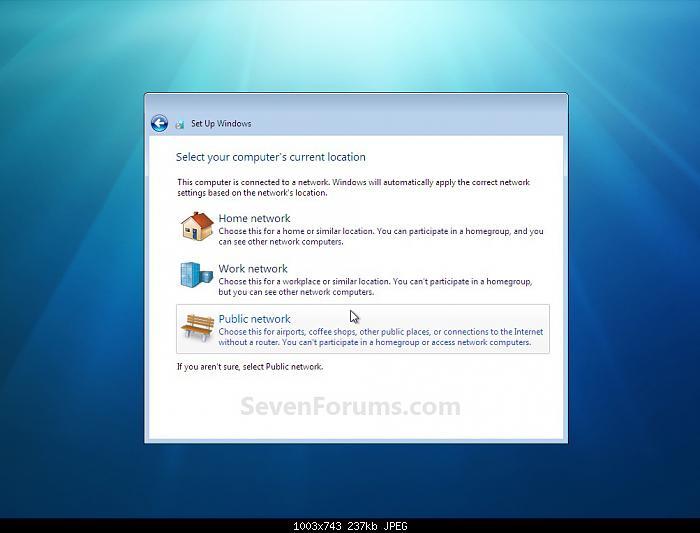
20. Choose which location corresponds to the network you are on, home, work, or public.
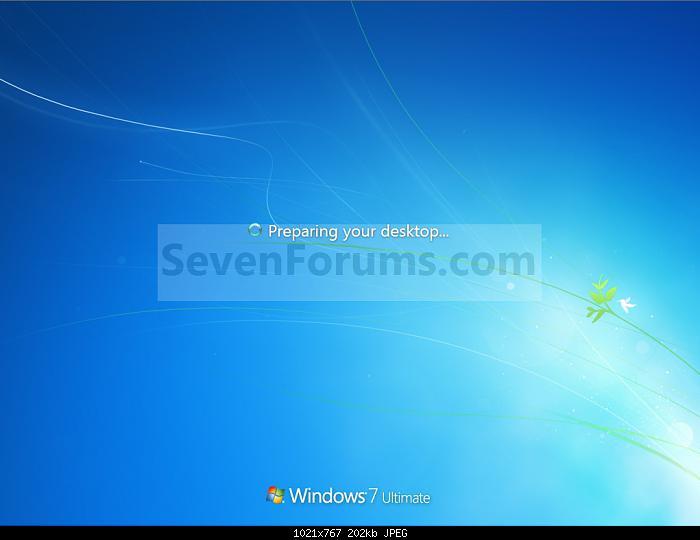
21. You’re almost there! Windows 7 will now prepare your desktop for you, the last step in the process.
22. It is now safe to remove any installation media you were using, you can eject your USB or remove the DVD from the drive.
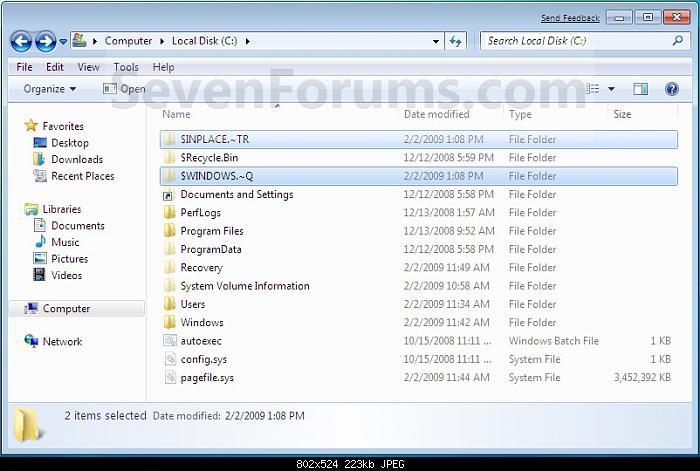
23. Now comes the time to check if you’re missing any user files. If you are, then you can copy them from the C:\Windows.old or the hidden protected operating system C:\$INPLACE.~TR and C:\WINDOWS.~Q backup folders. In order to unhide these files, open Windows Explorer and int he top left corner choose Organize. Look for Folder Options in the list and click it. Now scroll through and look for the radio button that says “Show hidden files, folders, and drives” click it and choose apply and then OK.
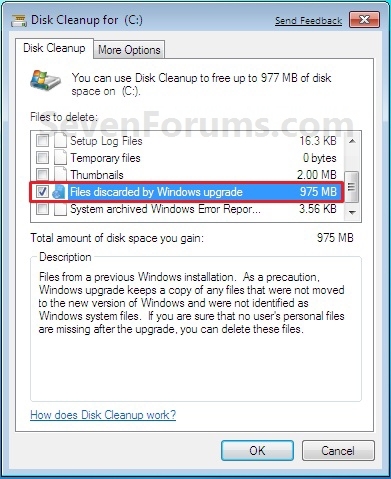
24. As long as nothing is missing, or you’ve restored the files that were missing using the steps above, you can now run Disk Cleanup. Click the start menu and in the search box type Disk Cleanup. When it opens, run it. When the process finishes, look in the list for “Files discarded by Windows upgrade” and check the box next to it. Choose OK. (Note: This will delete the folders we used above to restore any missing personal files, make sure you do not need them anymore)
25. That’s it! Make sure you activate Windows if you haven’t already, check for Windows updates, and turn on any Antivirus protection if you turned it off.
Original Guide and Images By Shawn at Windows Seven Forums. It can be found here: Original