Unfortunately there comes a time when your computer may have a system problem that is difficult to remedy. Often repairing the system files will solve this. This process can be used to try and solve problems in Windows XP when you are looking to keep important files, settings and software. Even though this process is not designed to remove personal files, it is often advised that you back up anything valuable to ensure its safety. Proceed through the steps below after reading the warnings detailed at the bottom of the guide.
There are several warnings that come with this tutorial, please scroll to the bottom of this post and read them before proceeding. They are shown below in red. Also remember to back up any critical files for extra safety. This process should not lose any files but as to not take any chances, make sure your critical files are backed up. You also may want to print out these instructions to follow along.
Windows XP Repair Install
1. You will need to insert your installation media into the disk drive and boot them computer from the disk.
2. In order to boot from the disk, you may need to enter the system bios to change the boot order. If it is already applied, you will see the “Press any key to boot from CD” option while your computer is turning on. Press any key to advance into that menu.
3. After booting from the disc, you will be presented with the Welcome to Setup screen. This screen has several options.
A. To Setup Windows XP Now, press ENTER
B. To repair a Windows XP installation using Recovery Console, Press R.
C. To quit Setup without installing Windows XP, press F3.
4. You want to choose OPTION A. DO NOT choose the Repair option. Press ENTER for OPTION A.
5. Press Accept on the next screen so that Microsoft can search for existing installations.
6. Find the XP installation you want to repair from the list and press R to begin the repair process. Remember, if repair is not an option, DO NOT continue through this process. Read Warning 2 again below.
7. This process will copy the necessary files to the hard drive and then will reboot the computer, so don’t worry if you see the computer restart once or twice. Do not press any key when the message “Press any key to boot from CD” appears. Just let the computer continue through it’s process.
8. You now need to reapply updates and service packs. You can download the service packs below:
If you used the Slipstream method presented in the warnings, you can skip this step as they should already be installed.
That’s it, you’ve completed the repair install!
Warning 1
Make sure that you should be performing a repair install.
This process is not always the one-stop fix all for all non-boot situations. Follow the procedure below only if you can still boot into Windows.
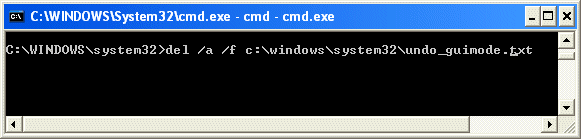
1.Manually delete the Undo_guimode.txt file from the Windows\System32 folder. This should be done before you continue through the symptoms section above.
2. Delete this by opening the command prompt. Click on start and choose Run.
3. In the run box type cmd and click OK.
4. Type this in the Command Prompt window: del /a /f c:window\system32\undo_guimode.txt and press Enter. (See photo below)
Warning 2
What should I do if the repair option is not available?
**If the repair option is not available and you continue with the process you will delete your Windows folder, Documents and Settings folder, and all software that has been installed will need to be reinstalled. **
You should exit the setup process if the repair option is not available for you to choose and look for another option. These options may be to purchase a new hard drive and perform a clean install on that and then restore your media to it. You are able to get important documents and files from your old hard drive and move them to the new one.
Warning 3
Before connecting to the internet, make sure to apply updates and reinstall service packs. If your installation media did not have the service packs originally, then a repair install will remove them and you’ll need to add them to your installation media with the process below.
The best way to do this is to create a SlipStreamed Installation disk. This process will put the Service Packs on your original installation DVD.
The best way to do this is using a program called AutoStreamer. You can download it here, with a step by step guide here.
Original guide written by Michael Stevens on michaelstevenstech.com. It can be found here.